


Fiberglassing
Health and Saftey
-
A respirator must be worn at all times and there must be adequate ventilation
-
Fibreglass gel coat and laminating resin contains proprietary polyester resin and styrene monomer which is harmful and flammable
-
the resin is very toxic in its liquid state
-
It will irritate the eyes, skin and respiratory system
-
Hand protection is needed-avoid latex gloves because of how common allergies are
Benefits of using Fiberglass
-
you can use it as a mold material for baking foam latex in an oven in less time than it takes using stone mold.
-
It is lightweight and very tough. this makes it easier for handling and helps with faster curing times when making foam latex appliances
-
It is easy to use
-
Inflexible (however, you have to be careful of undercutsas you may find it hard to remove the mold)
Key Terms
Cutting Edge-(or blending edge) is where the positive and negative mold parts touch and becomes the thin prosthetic appliance edge that disappears when it is applied
Core-the interior positive portion of a multipiece mould (your sculpt)
Flange-A projecting rim, collar, or ring on a mold that gives additional strength, stiffness, or support and provides an area for clamping or bolting mold sectins together
Flashing-excess casting material in a prosthetic mold that is separated from the appliance by the cutting edge of the mold. Also, the area of the mold where overflow collects
Keys-an indentation or protrusion to aid in precise alignment of mold parts
Undercut-any area of a positive or negative that creats a locking state between the mold and the core
Drilling holes
Why do the mold pieces need to be bolted together? Although the fibreglass is very strong and stiff, it is still thin therefore it is very flexible. By bolting the pieces together around the mould flange, the flexibility is taken away. The mold is now very firm and holding its shape for casting inside. An outline of where the holes will be drilled has been drawn on for a precise drilling.
Materials Needed:
-
Glass matting (this is actual glass. It is heated so that it changes it's structure
-
Matting fine surface tissue
-
gel coat resin (this is a thick polymer resin coat that is used to pick up detail before applying resin and fiberglass mat or fiberglass cloth as strength layers)


Application
Filling With Gelatin
Sculpting
Texturing
Moulding


Injecting with silicone


Reference for inspiration
A sculpting tool has been used to shape the folds around the eyebrows, and a loop tool has been used to take away parts of clay to form the wrinkles on the forehead. I started to see some interesting forms arising, next step is to texture the piece.
I used this sculpt image as inspiration to sculpt my piece. I love the wrinkled effect on the forhead, the skin looks very thick and tough. I started with small sausages to build basic shapes, and blended out.
Following up from watching some tutorials by Stuart Bray on how to texture, I used a thick plastic to create the wrinkles with a rake tool. I made sure the wrinkles intersected so that they looked more realistic. I layered the textures to help the piece look more authentic, and then brushed it with powder
Mould release is used on just the white areas of the mould to help it when it is released.
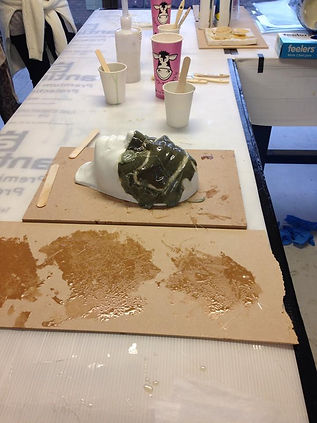
(gloves need to be worn, 2 for extra protection) Gel coat is then measured according to the size of the sculpt with 2% catalyst added. (this changes colour when the catalyst is added). This needs to cure for around 30minutes, until it becomes tacky as it creates mechanical bonds. Next, resin is also weighed out (more is weighed as it needs to be painted onto the sheets of the fibreglass) with 2% catalyst. A mud can be made for the undercuts in the piece, this is made by adding talc (make in a seperate cup and fill in the areas that may have an undercut) it is also added in the keys so it drapes over a lot easier. The sheets are painted onto the sculpt with the resin (the resin attacks the starch), it is better to have the edges of the fibre glass sheets ripped so that the rough edges intertwine (straight edges create a weak edge). A fine surface tissue (often referred to as a vail) is added on top of this to smooth over the sharp fibreglass
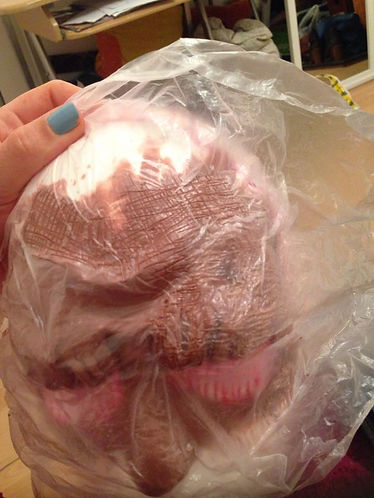
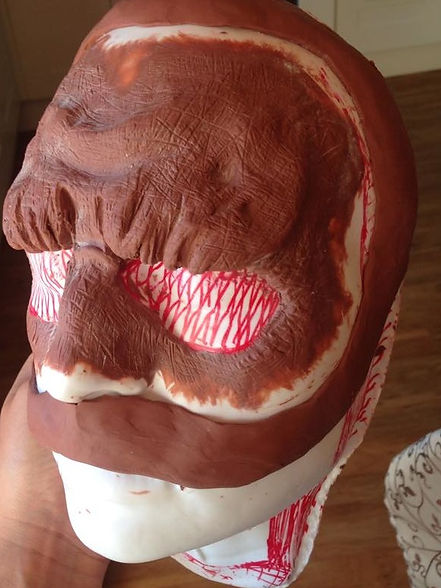
The mould is cleaned with mould release which creates a paste, then cleaned out with neat fairy liquid. I had to do this process several times to get my mould clean. Next, I applied a small amount of vaseline to help when releasing the mould. I added a few drops of pigment to the gelatin and some red flock to make it look like real skin. I feel like the vaseline gave it a nice sheen to the piece, however, as I was creating a dry skin texture I preferred it to be matt so I powdered over it. The edges on this piece seemed very blendable.
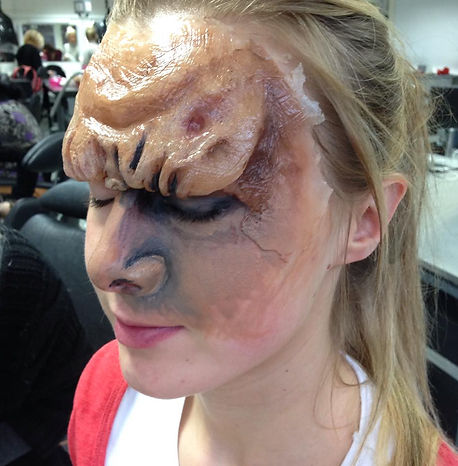
As the piece was formed onto a generic face, it did not fit my model, it was much too big for her which meant that I lost the blendable edges trying to fit it to her face. I painted with illustrator onto my piece which worked really well. I used skin tones to start with and began adding depth with darker colours in the creases. I began painting the face and resizing the nose just with colours.
I started using facepaints for the rest of the face to try and blend the forehead piece into the rest of the face, this ended up looking too heavy and caked, I preferred the makeup when I first started, however, it was still useful to experiment with a different material onto the gelatin piece.
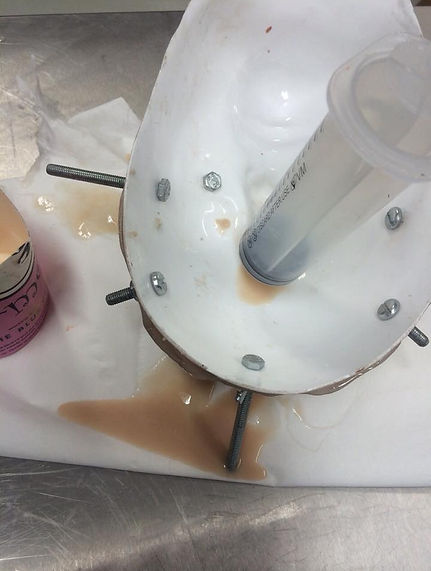
To create the silicone mould, there needs to be a tight fit for the moulds. Therefore. A hole is drilled into the thickest part of the mould for the silicone to run out.
I added a small amount of mould release to help pull the moulds apart. Next, all the bolts are placed into the mould and screwed up loosely. The silicone is weighed (I weighed my gelatin piece to estimate the amount needed), equal parts A, B and 75% deadener (depending on how soft you need it to be) I added a couple of drops of pigment and poured into my injection gun. The silicone is pushed through and floods out through the keys. Once it had all been injected I screwed up the bolts as quickly and as tightly as possible, and left the silicone to cure.
It was disheartening to see my silcione piece had gone completely wrong. Next time I will use more mould release to help keep the piece in one